How to create Custom Adapter for Recycler View [Android] — Kotlin

Why do we need a Adapter?
In Android adapter is used as a bridge between the data source and a user interface(view). Views such as Recycler View, and List Views. By using an adapter in simple words we fill the view with data and handle user interaction. Now we understand why we need an adapter and it is necessary to make an adapter.
No, because there is so many in-build adapter Android provide us like ArrayAdapter, CursorAdapter, and SimpleCursorAdapter. So you thinking why did we need to make another adapter?
The answer is taking more control and customization. So that we will modify it and use it according to our needs.
Most of the time for showing a list or grid we will use a recycler view because it is much more efficient than any other view container. There is one question that arrived in your mind what is the recycler view and why do we need it in 100 words I will explain to you.
Why do we need of RecyclerView?
Recycler view is a newborn baby of ListView and GridView components. A recycler view is a container view that holds and manages a collection of views. In simple word it show list when you scroll which we generally see in an app. Why do we need it? this is designed in a way to handle a large set of lists or grid data efficiently most famous things about is it recycle and reuse view as items are scrolled on and off the screen so that memory consumption reduces. You can see the below image. I think now you understand the recycler view and its need.

From the above we have enough knowledge about what is an adapter, why do we need to make a customer adapter, what is Recycler view and its need now we discuss how to make a customer adapter for Recycler view. Let’s clarify one thing For small data we use list view and an in-built adapter of Android but in most cases, we will use recycler view so that we make an adapter for recycler view.
Custom Adapter in 7 steps:
Step 1: First we make a class you can give any name but I give it MyAdapter name.

Step 2: After that now we work in MyAdapter Class line first we write var then the name of Data/info where all data is stored to show the user it means var newsArrayList is the name of storage where all data/info is stored. If we fetch data from API then we input that data class of that json variable name.
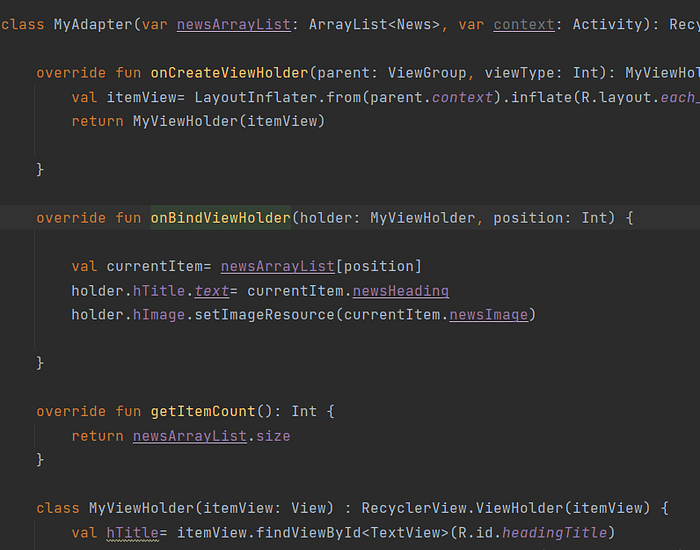
var newsArrayList: ArrayList<News>: This line declares a variable named newsArrayList of type ArrayList<News>. When you create 2 or 3 adapter your confusion will clear more. Then come context: Activity some time we write this word. By this, we tell in which activity this adapter will going to apply. After bracket close this is like by default we write RecyclerView.Adapter it is foundation for creating custom adapters for RecyclerViews. It provides the necessary methods and callbacks for managing data and creating views within the RecyclerView.
After that we use generics <> and in between first we write class name MyAdapter in our case then ViewHolder class name MyViewHolderfinally it look like <MyAdapter.MyViewHolder> this is not necessary you use this name you can use according to you ease. Then after generics, we use round bracket () and after that under curly bracket we perform all the operation.

Step 3: When you perform above task then a red line show below the RecyclerView.Adapter<MyAdapter.MyViewHolder> when you hover the cursor then it will create a class of MyViewHolder plus some function also will created which is essential for any adapter. After all these stuff done then we start working inside the function and class. Let’s Start with override fun onCreateViewHolder which is first function in adapter.
Step 4: Why we using/need of onCreateViewHolder function???
In simple language, it is called by recycler view when new ViewHolder instances are needed to represent items in the recycler view. It create a new ViewHolder and associates it with the inflated view. And this ViewHolder is then reused for other item as they scroll into view.
By default Line 1 remain same in every onCreateViewHolder function. If you can’t understand onCreateViewHolder inside code then in short say you just change R.layout ID name according to your layout name otherwise everything remain same in every adapter that you will creating. Let’s deep-dive into onCreateViewHolder function code.

first, we create val name of itemView then we use LayoutInflater class, LayoutInflater is a class in Android that is used to instantiate layout XML files into corresponding View objects. It is responsible for converting the XML layout file into an actual View object.
LayoutInflater.from(parent.context): This obtains theLayoutInflaterinstance from thecontextof the parent view. Theparent.contextprovides the context of the parent ViewGroup, which is typically the activity or fragment hosting the RecyclerView.inflate(R.layout.each_row, parent, false): Theinflate()method is called on theLayoutInflaterinstance to inflate the layout file specified by the resource IDR.layout.each_row. You can place your XML file name ateach_row. The third parameterfalseindicates that the inflated view should not be attached to the parent ViewGroup immediately.- In Short Line 2 is created because this line of code uses the
LayoutInflaterto inflate the layout file (R.layout.each_row) into a View object. This view is then assigned to theitemViewvariable, which will be used later to bind data to the views within the ViewHolder. - Line 3:
return MyViewHolder(itemView): This line creates a new instance of theMyViewHolderclass, passing the inflateditemViewas its constructor argument. TheMyViewHolderinstance is then returned as the result of theonCreateViewHolder()method. If you can’t understand meaning of instance word it means your OOP concept is not clear in short instance means object. - Now we understand use of
onCreateViewHolderfunction and what operation we need to perform inside the function. Let’s move toonBindViewHolderfunction.
Step 5: When red line show on MyViewHolder and when you hover your cursor you see a class of that name is created class MyViewHolder. And one thing Line:1 is automatically created when class MyViewHolder will be created.

So first we discuss why we need this class then we are avail to understand Step 6. So in simple words, it serves as a container for holding references to the view within an item layout of the recycler view and for easier implementation of data binding in the onBindViewHolder() function that we will discuss in step 6.
So I think now you understand why Adapter created a nested class.
Step 6: Why do we need of onBindViewHolder function???
First, we discuss what is the need of onBindViewHolder() function.
In simple words the data which we store somewhere or by API we fetch data. All data we need to be shown somewhere or in views so that in step 5 make class MyViewHolderclass where views reference id we store in a variable for our ease.
So in casual language when we get the path to a billboard(views) so on that billboard some image, data, and info is need to be shown.
So by onBindViewHolder() function we insert or bind new data in that billboard(view). Now you understand why we need of onBindViewHolder() function.
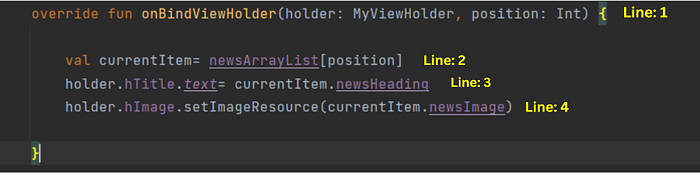
So Line 1 automatically will be created so don’t worry about line 1. Let’s come to line 2.
In Line 2 we create a variable to store data that we get from a source, here source is newsArrayList and in bracket[position] is written I explain you by a example.
Let’s take I have data of 10 people now data of first, second, third person is bind in view now it is term of fourth person so from newsArrayList[position = 4] we take data of fourth person. In simple language this is the meaning of Line 2 getting data of a particular position.
In Line 3 and 4 we first use holder(we get access of reference id store variable) and after that we set the content in the views. And one thing currentItem. dot we see newsHeading and newsImage text this things we create in a News data class which you will also creating in your recycler view project. Image of that data class below.

Step 7: This is our 7th and last step of creating an Adapter you see in below image this is easy and same code you will see in every adapter. You just need to work for Line 2 because Line 1 auto-created by android studio.
So in Line 2 we write return space data storage or source name you can see below data source from where data is coming name is newsArrayList, so write that then dot size and your getItemCount function is completed.

So above we created a Custom Adapter which is necessary mainly in RecyclerView. We created and believe me I watch 13+ videos on adapters plus 8 articles I read, 4 adapter classes Icreated to know why and how a custom adapter will created.
So by reading this blog you can’t become master you need to practice and after creating 4 or 5 adapter you will more relate or understand this blog.
So go and create one adapter to check your knowledge about Adapter. Namaste🙏